
10 Polymer Clay Earring Ideas Using Our Polymer Clay Earring Cutters
Whether you’re new to making polymer clay earrings or an experienced crafter, finding fresh design ideas can take your creations to the next level. In this blog, we’re bringing you 10 unique polymer clay earring ideas that you can easily replicate at home. Each design uses our own brand of clay earring cutters in addition to a few simple tools to help you craft beautiful, professional-looking earrings with ease. From timeless studs to bold statement pieces, these designs will inspire you to play with shapes, textures, and techniques while making your own custom earrings. Now let's get started and dive into our first design!
Materials & Tools List:
Below you will find a complete list of everything used throughout this blog. You many not need the full list if you are only interested in creating a handful of our clay earring ideas so please review the list before heading off with your shopping list:
Polymer clay (check out our other blog to make sure you are using the correct clay - click here)
Polymer clay cutters (All of the clay cutters used throughout this blog can be found here)
Clay roller or acrylic rolling pin
Craft blade or precision knife
Earring posts, hooks, and backs
Superglue or UV resin
Texture mats or stamps
Water-soluble transfer paper
Baking tray and parchment paper
Sandpaper or buffing tool (optional)
Tassels or fabric accents (for specific designs)
Metallic foil or mica powder (for specific designs)
1. Classic Studs: Timeless and Simple
Classic stud earrings are a staple in every jewelry collection. Their simplicity and versatility make them a go-to choice for any outfit, whether you're dressing up for a night out or keeping it casual during the day. Plus, they’re quick and easy to make, allowing you to experiment with colors and finishes to match your unique style. Let’s dive into how you can create your own stunning pair of classic studs!
Method:
Start by conditioning the polymer clay until it’s soft and pliable. Roll it out evenly using a clay roller to about 2-3mm thickness.
Use your round or square polymer clay cutters to cut out the stud shapes. Keep the shapes simple for an elegant look.
Carefully transfer the cutouts to a baking tray lined with parchment paper. If you want smoother edges, gently run your finger or a blade around the edges before baking.
Bake the clay according to the instructions on the clay package (usually around 110°C to 130°C for 15-30 minutes, depending on thickness - please refer to the instructions provided on the clay you are using as this may vary).
Once baked and cooled, sand the edges of the studs if needed, to ensure they’re smooth.
Attach earring posts to the back of each stud using superglue or UV resin. Allow the adhesive to set fully before wearing.
Notes: The following cutters were used to create this inspiration:

2. Geometric Dangles: Modern and Minimalist
Geometric dangle earrings are a trendy choice that adds a modern touch to any outfit. With sharp lines and bold shapes, these earrings can be easily customized to reflect your personal style. They’re perfect for making a statement without being overly complicated. Here’s how you can make your own geometric dangles!
Method:
Roll out your chosen polymer clay to about 2-3mm thickness.
Use various geometric cutters (triangles, rectangles, or hexagons) to cut out different shapes for your earrings.
Mix and match colors for a striking contrast, or keep them monochromatic for a sleek look.
Use a craft blade to cut holes at the top of each shape for attaching earring hooks later.
Transfer the shapes to a baking tray lined with parchment paper and bake according to the clay package instructions.
Once cooled, attach earring hooks through the holes you created earlier.
Notes:
The following cutters were used to create this inspiration:

3. Floral Petals: Nature-Inspired Beauty
Bring a touch of nature to your jewelry collection with floral petal earrings. These delicate designs can brighten up any outfit and are perfect for spring and summer. Plus, they allow for endless customization in colors and textures. Let’s get started on crafting these beautiful floral earrings!
Method:
Condition and roll out your polymer clay to your desired thickness.
Use floral cutters to create petal shapes. You can use multiple layers to give depth to your design.
For added texture, press a texture mat onto the clay before cutting.
Bake the petals on a tray according to the package instructions.
After cooling, assemble the petals by gluing them together in layers, creating a 3D effect.
Attach earring posts or hooks to the back of the finished flower.
Notes:
The following cutters were used to create this inspiration:

4. Marbled Texture Drops: Playing with Color
Marbled earrings add an artistic flair to your jewelry collection. This technique combines different colors of polymer clay to create stunning swirls and patterns, resulting in unique pieces every time. They’re a fun way to explore color blending while making beautiful statement earrings. Here’s how to create your own marbled texture drops!
Method:
Take two or more colors of polymer clay and condition them.
Roll each color into long, thin logs and twist them together to create a marbled effect.
Roll the twisted clay into a ball and flatten it slightly to form a drop shape.
Use your preferred cutter to cut out the final shape, ensuring to smooth the edges.
Bake the pieces according to the instructions.
Once cooled, attach earring hooks or posts.
Notes:
The following cutters were used to create this inspiration:

5. Abstract Statement Pieces: Bold and Unique
If you want to stand out, abstract statement earrings are the way to go. With their bold shapes and unconventional designs, these earrings allow for maximum creativity and self-expression. They’re perfect for making a statement at any event. Let’s get into how to create these eye-catching pieces!
Method:
Roll out your polymer clay to about 3-4mm thickness.
Use various cutters or a craft knife to create abstract shapes. Think outside the box with asymmetry and layering.
Experiment with colors, patterns, and textures. Consider using different techniques like marbling or stamping.
Bake the pieces according to the instructions on the clay package.
Once cooled, assemble the pieces together with glue and attach earring hardware.
Notes:
The following cutters were used to create this inspiration:

6. Seasonal Shapes: Perfect for Any Occasion
Celebrate the seasons with earrings that reflect the time of year. Seasonal shapes, like leaves for autumn or snowflakes for winter, can make your jewelry collection feel fresh and fun. These earrings are great for festive occasions or simply adding seasonal cheer to your everyday outfits. Here’s how to create these delightful seasonal earrings!
Method:
Choose a season and select appropriate shapes using your polymer clay cutters (e.g., christmas trees, pumpkins or snowflakes).
Roll out the polymer clay and cut out the shapes using your chosen cutters.
Add details with stamps or texture mats for added interest.
Bake the shapes according to the clay package instructions.
Once cooled, attach the appropriate earring hardware.
Notes:
The following cutters were used to create this inspiration:

7. Boho Tassel Dangles: Mixing Clay and Fabric
Add a fun, bohemian flair to your jewelry collection with tassel dangles. These earrings combine polymer clay shapes with colorful tassels to create eye-catching designs that sway and move. They’re perfect for adding a pop of color and texture to your outfits. Here’s how to create these playful earrings!
Method:
Roll out your polymer clay and cut out your desired shapes (half-moons or geometric shapes work great).
Bake the clay pieces according to the package instructions and let them cool.
Once cooled, attach colorful tassels to the bottom of each clay piece using jump rings.
Finally, attach the earring hooks or posts.
Notes:
The following cutters were used to create this inspiration:
8. Design Transfers: Custom Patterns with Transfer Paper
Take your earrings to the next level with custom patterns using design transfers. Water-soluble transfer paper allows you to apply intricate designs directly onto your polymer clay, making each piece uniquely yours. This technique is perfect for creating detailed earrings without the fuss. Here’s how to use transfer paper for your designs!
Method:
Prepare your polymer clay by conditioning and rolling it out to your desired thickness.
Cut your clay into the desired shapes using your chosen cutters.
Print or draw your design onto water-soluble transfer paper.
Apply the transfer paper to the clay following the instructions provided.
Bake the clay according to the package instructions.
Once cooled, attach earring hardware to your decorated clay pieces.
Notes:
The following cutters were used to create this inspiration:

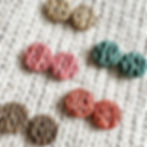
9. Textured Impressions: Adding Depth
Textured impressions create depth and interest in your earrings. By using texture mats or stamps, you can easily add unique patterns and designs to your clay pieces. These earrings can be made in various shapes and colors, making them a versatile addition to any jewelry collection. Here’s how to create these textured beauties!
Method:
Roll out your polymer clay to your desired thickness.
Press a texture mat or stamp onto the clay to create your pattern.
Use your chosen cutter to cut out the shapes from the textured clay.
Bake according to the package instructions and allow them to cool.
Attach your earring hardware to finish your textured earrings.
Notes:
The following cutters were used to create this inspiration:

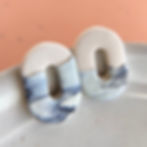
10. Cutout Shapes: Playing with Negative Space
Cutout shapes are a fun way to create lightweight, visually striking earrings. By using our polymer clay cutters, you can create earrings with unique negative space designs, adding an interesting twist to traditional styles. These earrings allow for creativity and can be customized to suit any outfit. Let’s explore how to make your own cutout shape earrings!
Method:
Roll out your polymer clay to about 2-3mm thickness.
Use a cutter to cut out a shape, then use a smaller cutter to create the cutout in the center.
Carefully transfer the shapes to a baking tray lined with parchment paper.
Bake according to the instructions on the clay package.
Once cooled, attach earring posts or hooks.
Notes:
The following cutters were used to create this inspiration:
Related Posts


